Simple, Time Saving, Inboard Electric Boat Motor Installation.
Designing electric inboard boat motors that are easy to install.
We understand the importance of simplicity and efficiency in the marine industry, so our motors are crafted for seamless integration, minimising installation time and effort, allowing customers to focus on the journey.
Delivering the highest quality marine electric motors.
By using components sourced from Europe’s most reputable manufacturers and the UK’s top-tier suppliers. Our motors are specially constructed for superior durability, performance, and reliability. By selecting only the finest parts, we provide customers peace of mind, knowing their installation is built to last. Törkmar motors are designed to minimize future warranty risks, ensuring long-lasting, trouble-free operation. Rest assured, we are available with full support should any complications arise, ensuring you stay focused on the journey, not the equipment.
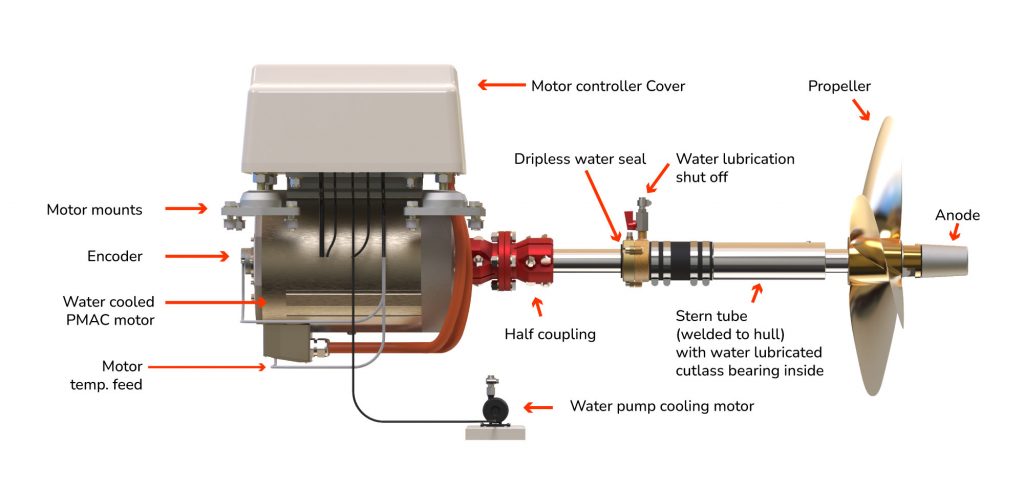
1. Check motor beds, stern tube and loosely fix motor mounts
- Check that measurements are in accordance with drawings provided: Motor mounts need to be fixed with 10mm stainless steel bolts and locking nuts. Loosely fit to allow for motor and shaft alignments later.
- Tip: Drilling and tapping the holes will make aligning the motor to the shaft much easier. It allows you to gently tap the mounts into position with the securing bolts loosely pinched. Once you have achieved perfect alignment, tighten the bolts firmly. Finally, secure the underside of the bearer with a flat washer, split washer, and nut

Download PDF drawings of motor beds and motor position on a Narrowboat.
2. Dry fit propeller to determine length of shaft
- Important: use provided silicone lubricant and shield to protect seals.
- Cut shaft to suit: pay special attention to burrs as they will damage the shaft.
- Tip: position 2 Jubilee Clips either side of the cut. Then use hacksaw, not grinder, for best result.
- Tip: do not have shaft poking out of mating face of either half coupling, this will make align difficult.

3. Alignment of motor and shaft
- Aligment in 3 directions: 1- use bolts under heat sink plate to match correct shaft height. 2 - Adjust fore and aft so that the heat sink plate is on the same plane a shaft. 3 - Use bolts on motor mounts to rotate the motor.
- Support: use your hand to support the weight of the shaft.
- Light: position a torch directly under the half couplings so you are able to see if the gap around the flange is even top, bottom, left and right.
- Correct bolts: pull the male and female half coupling together. Make sure to use the correct lenght bolts (not to long) it split washers. Tighten evenly.
4. Connect coolant water pump
- Antifreeze: use Morris MEG Antifreeze. This Ethylene Glycol based antifreeze, which meets the technical requirements of BS6580:1992. Dilute as per specifications and expected temperatures.
- Use clear reinforced 12mm ID hose: Route from motor to pump then to the 'skin tank' and then back to the motor.
- Header tank: Törkmar installations use a skin tank common with the generator which has its own header tank. If however your are using a separate skin tank you should have a separate header tanks.

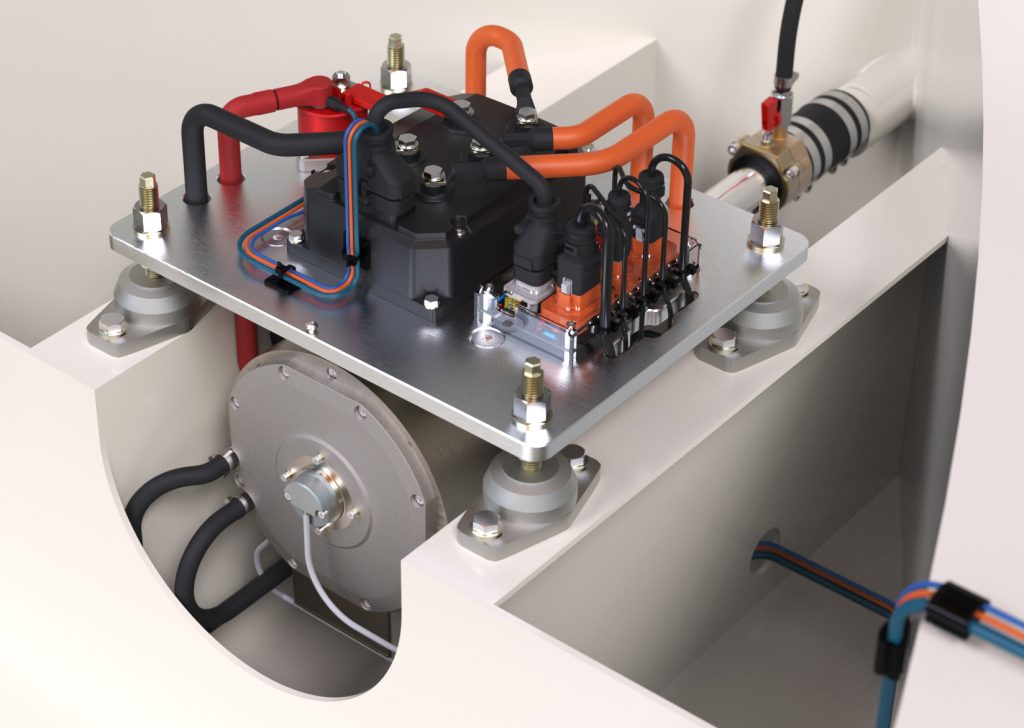
5. Connect power and communication
- Check factory leads: ensure all cables that are factory fitted are securely fastened
- Check other leads: namely battery +ve and -ve, throttle, water pump power, CAN cables

6. Connect Throttle
- Throttle Plate Standard: Connect 8 pin deutsch plug to Controller Interface board
-
Throttle Plate with Display: Connect 8 pin deutsch plug and ethernet/mate-n-lok cable to Controller Interface Board
- Carling Switch x3: 1 Series V Carling switch is already installed for the motor cooling pump. This leaves 3 spaces for the boat builder to install a bilge pump, horn and tunnel light if required.
-
Throttle plate with display : plug only the throttle display into the ethernet conection marked 3141 display. This connection is powered.

7. Connect to boat monitor
- Connect to controller interface: use ethernet cable provided to connect the motor to the Victron GX device (VE can port 1 or 2)

- Total Control on a Single Screen: Törkmar’s proprietary software integrates your narrowboat's systems. It connects your Victron electrical monitoring with your electric motor. Everything is displayed on the Victron Ekrano for a complete overview.
- A Smarter Home Page: We replace the standard Victron layout with a new home screen. It is designed specifically for the needs of a boater. You can easily see what power is coming in. What is stored. And what is going out. All in a simple, at-a-glance view.
- Clear Information at the Helm: A separate page is dedicated to your motor. All information is shown in a large typeface. This makes it easy to read from the helm while you are underway.
- Know Your True Range: The display calculates your boat's real-time cruising range. It constantly updates based on your power usage and current solar input. It also monitors your motor temperature and the often-overlooked controller temperature, helping to protect your vital equipment.
- Unified Tank Monitoring: The dedicated tank page uses the same clear graphics. It brings information from all tanks together in one place.
- View Your Boat From Anywhere: All of this information is also available on your phone or computer. Use Victron's free VRM portal to check on your boat's systems from anywhere on you boat to anywhere in the world.